Just thought to have a short break from my series of posts on Tumbarumba Station Building Kit Bash, as I do want to present posts for other projects that I had running in parallel. Well one of the upcoming posts involves the manufacturing some of the detailing for Tumbarumba Station Building, so in a way not stalling on the updates on that front.
Over this year, whilst waiting for other supply of items that were needed to move forward with the Kit Bash activity, I decided to get started on one of the Scratch Building projects just to keep things moving forward.
When I decided to model Tumbarumba, I set a personal challenge for myself to try and make it as prototypical as possible. This meant if a line side item could not be acquired from the market place, then I would need to somehow manufacture it myself.
As being new to this level of modelling, I had to learn how to construct the required items.
This means building item from scratch using materials such as styrene to the more modern day method of modelling, 3D Printing.
Thankfully, the Model Rail club that I am part of has a good mix of talented Railway Modellers who were more than willing to educate me in these methods of Modelling.
Hopefully this post will be helpful for someone out there who wishes to get initiated into some scratch building activities. I have personally found that this Project is one of the best examples to get initiated with scratch building.
My First Scratch Building Exercise (Weigh Bridge Office)
First of all, during my researching, I was only able to find one picture of Tumbarumba Weigh Bridge Office which was a distant background object in a photo. It was the older style cladded weatherboard type, not a Precast Concrete Weigh Bridge Office to the likes of the one based at Bombala. This was a bit of a surprising find, but found out later on that the cladded weatherboard type of Weigh Bridge Offices were a common sight at locations where both 10" and 15" Precast Station buildings resided.
I sourced the plans for this scratch build exercise from the NSWGR 20 Ton Weigh Bridge and Pit Greg Edwards Data Sheet G7. This Data Sheet contains three different examples of the Cladded Weatherboard Weigh Bridge Offices.
With the limited information I had on Tumbarumba Weigh Bridge Office, I concluded that I needed to model a version that combines both the Queanbeyan and Wauchoupe examples that were detailed in the Greg Edwards Data Sheet G7.
From the Data Sheet, I determined that I needed the following items:
- Evergreen 4061 Clapboard Styrene Sheet (1.5 mm Spacing, 1 mm Thick) for the Wall Cladding
- Evergreen 4526 Metal Siding (1 mm Spacing, 1 mm Thick) for the Roof
- Evergreen 111 Styrene Strips (0.4 mm x 0.75 mm) for the Door Frame
- Evergreen 120 Styrene Strips (0.5 mm x 0.5 mm) for the corner studs
- Evergreen 123 Styrene Strips (0.5 mm x 1.5 mm) for the detailing of the Roof and window framing
- Evergreen 124 Styrene Strips (0.5 mm x 2 mm) for the fascias and the Roof Capping
- Evergreen 142 Styrene Strips (1 mm x 1 mm) for the lower Window Frame detailing and internal frame detailing
- Evergreen 153 Styrene Strips (1.5 mm x 1.5 mm) for the Centre Beam between the Windows
- Evergreen 219 Styrene Rods (0.64 mm) for the Roof capping detailing
- Plastruct 90502 Styrene Angle (1.6 mm) use as a bracket inside to hold in the door
- Grandt Line 30" x 66" Planked Door HO Scale (Reference Number 5293)
- Grandt Line 12 Pane Window HO Scale (Reference Number 5009)
Note: I will do my best to describe the technical names of the components for this structure, I had to rely on Google searches to get the name of each component.
Some of the Tools that will be mentioned in this post:

- Zona Triangle (Purchased from Australian Modeller https://www.australianmodeller.com.au/collections/tools/products/zona-zo-37433-3-triangle)
- Nibbling Tool (Purchased from Jaycar https://www.jaycar.com.au/nibbling-tool/p/TH1768)
- Fiskars Soft Grip Rectangle Hand Punch (Purchased from Spotlight https://www.spotlightstores.com/craft-hobbies/paper-craft/cutting-tools/punches/fiskars-soft-grip-rectangle-hand-punch/p/BP80295454)
I will not be mentioning the Zona Triangle much in this post, but I found it to be a handy tool to use to keep items such as walls squared up when they have been glued up.
I also decided to design my own 3D print outs for the base and a 6 pane window frame. More details on this will be in an upcoming posts for 3D printed models.
Before going into the details for construction, here are a couple of examples of Weight Bridge office that are still in existence today.


The above 4 photos are of the Weigh Bridge Office that has been preserved at Gundagai that I photographed back in November 2017.

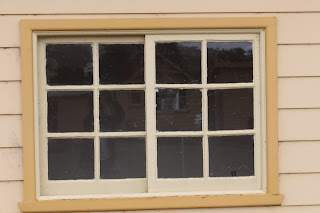
Above photo is the Bowral Weigh Bridge Office that has the similar window configuration to the one that I going to model for my Tumbarumba Layout. Unfortunately, for this example the windows have been boarded up. I took this photo back in October 2017.

Focusing back on the actual scratch build, there was a simple task to cut up of the Clapboard Styrene Sheet. Basically I drawn up the area on the styrene that was needed to be cut up.

I used Blu Tack to do a test build to see how it all turned out.

At this stage I had receive my 3D Printed base for the Weigh Bridge Office. I have cut up the front Clapboard panel to size to provide the provision for the window frame. The Grandt Line 12 Pane Windows are seen in the lower picture.
The Clapboard Styrene Sheet is 1 mm thick and to allow for the corner studs (which are the 0.5 mm x 0.5 mm Styrene strip) to fit flush with the Clapboard, I file out a 0.5 mm x 0.5 mm channels into the side edges on the none detailed side of the Clapboard cutouts for the front and rear walls.

You see another Window Frame that I got 3D Printed as per the dimensions provided from the Greg Edwards Data Sheet G7. To cut the area that I needed for the window, I made use of a Nibbling Tool that I purchase from Jaycar Electronics. The Nibbling Tool was suggested by one of my Model Rail Friends in the Club that I am part of. Certainly provides a nice straight clean cut.


The door way was cut out with the combined use of a Fiskars Hand punch which I acquired from Spotlight and the Nibbling Tool. The Fiskars Hand Punch was again another recommendation from one of my Model Rail Friends in the Club that I am part of.
I used the 1 mm x 1mm Styrene strips in the inside corners when gluing up the walls of the Weigh Bridge Office. I feel that by doing this, it allows for a stronger bond where the walls join up.
For the construction of the window frame. I first got a length of 1.5 mm x 1.5 mm styrene strip (for the centre beam of the window frame). I then filed out a 1.5 mm wide and 0.5 mm deep grove at one end of the strip so to allow for the 1.5 mm x 0.5 mm Styrene strip (to make up the head casting of the window frame) to be fitted in flush with the centre beam of the window frame and then glued them together.
The 2 x Grandt Line 12 Pane Windows were carefully glued into the window frame work that has been already constructed. I completed the remainder of the frame work on the edges (the side casting of the Windows) of the 12 Pane Windows with 1.5 mm x 0.5 mm Styrene strip, then trimmed off the overhanging styrene.
The great thing about this project is that the Grandt Line 12 Pane Windows are the same size to what is represented on the Greg Edwards G7 Data Sheet. The window frame fitted nicely to the model. To finish off the window fixture, I used a strip of 1 mm x 1 mm styrene to make the sill of the window frame. I fixed the strip for the Sill parallel onto the top of the lower section of the Front Lower wall overlapping 0.5 mm of the strip which will later on assist to secure the completed window frame to the model.


I made a late decision to do a bit of detailing of the framework inside the Weight Bridge Office.This was more so to show a bit of internal detailing due to the size of the windows. This was done with 1 mm x 1 mm Styrene strips and placed them as detailed in the G7 Data Sheet. Would have been certainly better if I did that before assembling this model. Also worth mentioning that I left a 1 mm space from each the strips that was used in the framework to the base of the model to allow for the model to fit onto the 3D printed base.
I have used the angled styrene to allow for the Grandt Line Door to be fitted into the model and fitted the remainder of the Clapboard at the top of the Window frame. The reason I have used the angled styrene is to allow the door to be slotted into the model. The G7 Data shows the door to be narrow in width. The angled styrene help give the Grandt Line door that narrow look when looking from the outside in. This also removed the need to cut the Grandt Line Door into a narrower width.
The corrugated Roof Section was cutout to size then glued onto the model.


The detailing of the Facias, Roof Capping, the door frame and door step was added.


I have Primed the model with Tamiya Primer and Painted the model with the following Colours.
- Humbrol Ligh Grey (for the roof)
- Model Masters Light Ivory Enamel
- Tamiya White Acrylic X2 (for the window frames)
I also used the Testers Dull coat once the painting was completed.
This model is not 100% completed yet as I do need to do the window glazing, paint the door and attach the guttering. The Weigh Bridge Table needs to be also manufactured (which is currently work in progress), but at the very least I can say that the main body of the Weigh Bridge Office is completed.


On a final note for this Scratch Build above are two more views just to show the detailing such as where the framework ends to allow the fitting of the 3D Printed Base. How the facias and the strip for the window Sill fits to this model. And demonstrates how the Grandt Line Door slots into the angled styrene within this model.
The next upcoming post will be covering the 3D Printed Items that I produced which will include the Base and 6 Pane Window Frame for this Weigh Bridge Office.
Over this year, whilst waiting for other supply of items that were needed to move forward with the Kit Bash activity, I decided to get started on one of the Scratch Building projects just to keep things moving forward.
When I decided to model Tumbarumba, I set a personal challenge for myself to try and make it as prototypical as possible. This meant if a line side item could not be acquired from the market place, then I would need to somehow manufacture it myself.
As being new to this level of modelling, I had to learn how to construct the required items.
This means building item from scratch using materials such as styrene to the more modern day method of modelling, 3D Printing.
Thankfully, the Model Rail club that I am part of has a good mix of talented Railway Modellers who were more than willing to educate me in these methods of Modelling.
Hopefully this post will be helpful for someone out there who wishes to get initiated into some scratch building activities. I have personally found that this Project is one of the best examples to get initiated with scratch building.
My First Scratch Building Exercise (Weigh Bridge Office)
First of all, during my researching, I was only able to find one picture of Tumbarumba Weigh Bridge Office which was a distant background object in a photo. It was the older style cladded weatherboard type, not a Precast Concrete Weigh Bridge Office to the likes of the one based at Bombala. This was a bit of a surprising find, but found out later on that the cladded weatherboard type of Weigh Bridge Offices were a common sight at locations where both 10" and 15" Precast Station buildings resided.
I sourced the plans for this scratch build exercise from the NSWGR 20 Ton Weigh Bridge and Pit Greg Edwards Data Sheet G7. This Data Sheet contains three different examples of the Cladded Weatherboard Weigh Bridge Offices.
With the limited information I had on Tumbarumba Weigh Bridge Office, I concluded that I needed to model a version that combines both the Queanbeyan and Wauchoupe examples that were detailed in the Greg Edwards Data Sheet G7.
From the Data Sheet, I determined that I needed the following items:
- Evergreen 4061 Clapboard Styrene Sheet (1.5 mm Spacing, 1 mm Thick) for the Wall Cladding
- Evergreen 4526 Metal Siding (1 mm Spacing, 1 mm Thick) for the Roof
- Evergreen 111 Styrene Strips (0.4 mm x 0.75 mm) for the Door Frame
- Evergreen 120 Styrene Strips (0.5 mm x 0.5 mm) for the corner studs
- Evergreen 123 Styrene Strips (0.5 mm x 1.5 mm) for the detailing of the Roof and window framing
- Evergreen 124 Styrene Strips (0.5 mm x 2 mm) for the fascias and the Roof Capping
- Evergreen 142 Styrene Strips (1 mm x 1 mm) for the lower Window Frame detailing and internal frame detailing
- Evergreen 153 Styrene Strips (1.5 mm x 1.5 mm) for the Centre Beam between the Windows
- Evergreen 219 Styrene Rods (0.64 mm) for the Roof capping detailing
- Plastruct 90502 Styrene Angle (1.6 mm) use as a bracket inside to hold in the door
- Grandt Line 30" x 66" Planked Door HO Scale (Reference Number 5293)
- Grandt Line 12 Pane Window HO Scale (Reference Number 5009)
Note: I will do my best to describe the technical names of the components for this structure, I had to rely on Google searches to get the name of each component.
Some of the Tools that will be mentioned in this post:

- Zona Triangle (Purchased from Australian Modeller https://www.australianmodeller.com.au/collections/tools/products/zona-zo-37433-3-triangle)
- Nibbling Tool (Purchased from Jaycar https://www.jaycar.com.au/nibbling-tool/p/TH1768)
- Fiskars Soft Grip Rectangle Hand Punch (Purchased from Spotlight https://www.spotlightstores.com/craft-hobbies/paper-craft/cutting-tools/punches/fiskars-soft-grip-rectangle-hand-punch/p/BP80295454)
I will not be mentioning the Zona Triangle much in this post, but I found it to be a handy tool to use to keep items such as walls squared up when they have been glued up.
I also decided to design my own 3D print outs for the base and a 6 pane window frame. More details on this will be in an upcoming posts for 3D printed models.
Before going into the details for construction, here are a couple of examples of Weight Bridge office that are still in existence today.


The above 4 photos are of the Weigh Bridge Office that has been preserved at Gundagai that I photographed back in November 2017.

Above photo is the Bowral Weigh Bridge Office that has the similar window configuration to the one that I going to model for my Tumbarumba Layout. Unfortunately, for this example the windows have been boarded up. I took this photo back in October 2017.

Focusing back on the actual scratch build, there was a simple task to cut up of the Clapboard Styrene Sheet. Basically I drawn up the area on the styrene that was needed to be cut up.


At this stage I had receive my 3D Printed base for the Weigh Bridge Office. I have cut up the front Clapboard panel to size to provide the provision for the window frame. The Grandt Line 12 Pane Windows are seen in the lower picture.
The Clapboard Styrene Sheet is 1 mm thick and to allow for the corner studs (which are the 0.5 mm x 0.5 mm Styrene strip) to fit flush with the Clapboard, I file out a 0.5 mm x 0.5 mm channels into the side edges on the none detailed side of the Clapboard cutouts for the front and rear walls.

You see another Window Frame that I got 3D Printed as per the dimensions provided from the Greg Edwards Data Sheet G7. To cut the area that I needed for the window, I made use of a Nibbling Tool that I purchase from Jaycar Electronics. The Nibbling Tool was suggested by one of my Model Rail Friends in the Club that I am part of. Certainly provides a nice straight clean cut.


The door way was cut out with the combined use of a Fiskars Hand punch which I acquired from Spotlight and the Nibbling Tool. The Fiskars Hand Punch was again another recommendation from one of my Model Rail Friends in the Club that I am part of.
I used the 1 mm x 1mm Styrene strips in the inside corners when gluing up the walls of the Weigh Bridge Office. I feel that by doing this, it allows for a stronger bond where the walls join up.
For the construction of the window frame. I first got a length of 1.5 mm x 1.5 mm styrene strip (for the centre beam of the window frame). I then filed out a 1.5 mm wide and 0.5 mm deep grove at one end of the strip so to allow for the 1.5 mm x 0.5 mm Styrene strip (to make up the head casting of the window frame) to be fitted in flush with the centre beam of the window frame and then glued them together.
The 2 x Grandt Line 12 Pane Windows were carefully glued into the window frame work that has been already constructed. I completed the remainder of the frame work on the edges (the side casting of the Windows) of the 12 Pane Windows with 1.5 mm x 0.5 mm Styrene strip, then trimmed off the overhanging styrene.
The great thing about this project is that the Grandt Line 12 Pane Windows are the same size to what is represented on the Greg Edwards G7 Data Sheet. The window frame fitted nicely to the model. To finish off the window fixture, I used a strip of 1 mm x 1 mm styrene to make the sill of the window frame. I fixed the strip for the Sill parallel onto the top of the lower section of the Front Lower wall overlapping 0.5 mm of the strip which will later on assist to secure the completed window frame to the model.
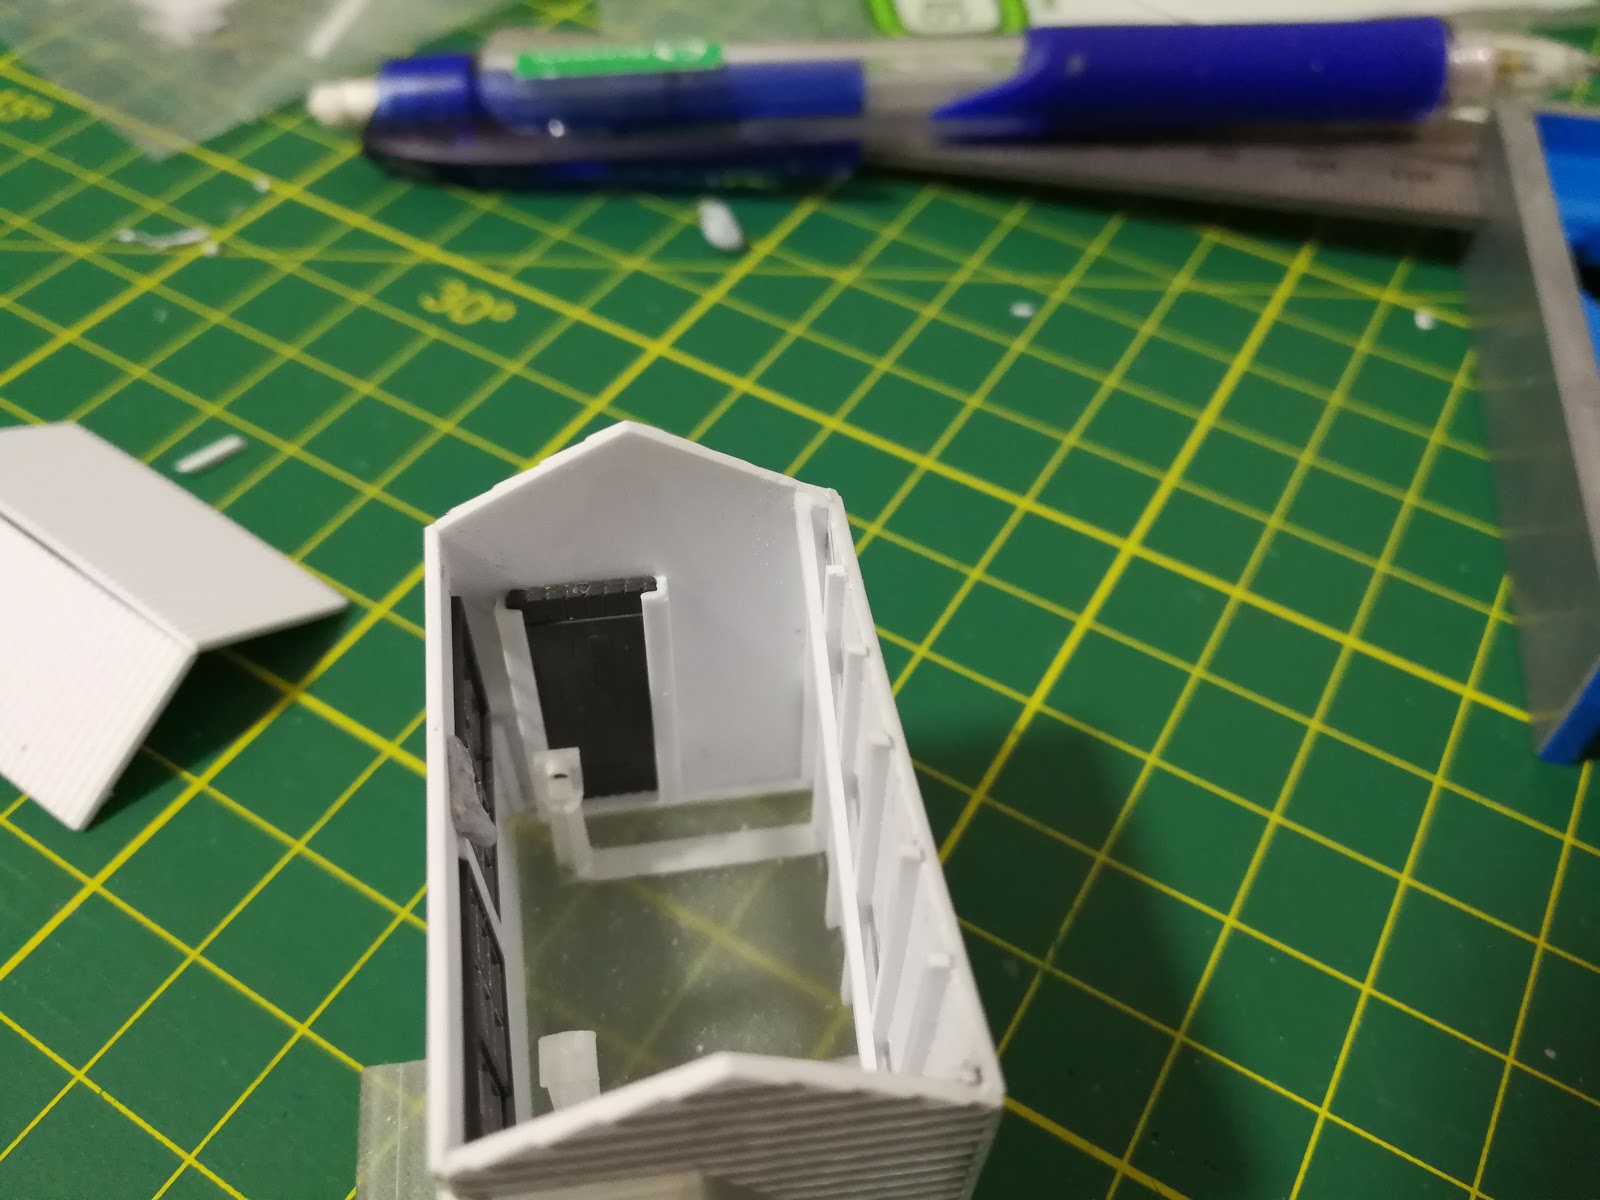


I made a late decision to do a bit of detailing of the framework inside the Weight Bridge Office.This was more so to show a bit of internal detailing due to the size of the windows. This was done with 1 mm x 1 mm Styrene strips and placed them as detailed in the G7 Data Sheet. Would have been certainly better if I did that before assembling this model. Also worth mentioning that I left a 1 mm space from each the strips that was used in the framework to the base of the model to allow for the model to fit onto the 3D printed base.
I have used the angled styrene to allow for the Grandt Line Door to be fitted into the model and fitted the remainder of the Clapboard at the top of the Window frame. The reason I have used the angled styrene is to allow the door to be slotted into the model. The G7 Data shows the door to be narrow in width. The angled styrene help give the Grandt Line door that narrow look when looking from the outside in. This also removed the need to cut the Grandt Line Door into a narrower width.
The corrugated Roof Section was cutout to size then glued onto the model.


The detailing of the Facias, Roof Capping, the door frame and door step was added.


I have Primed the model with Tamiya Primer and Painted the model with the following Colours.
- Humbrol Ligh Grey (for the roof)
- Model Masters Light Ivory Enamel
- Tamiya White Acrylic X2 (for the window frames)
I also used the Testers Dull coat once the painting was completed.
This model is not 100% completed yet as I do need to do the window glazing, paint the door and attach the guttering. The Weigh Bridge Table needs to be also manufactured (which is currently work in progress), but at the very least I can say that the main body of the Weigh Bridge Office is completed.


On a final note for this Scratch Build above are two more views just to show the detailing such as where the framework ends to allow the fitting of the 3D Printed Base. How the facias and the strip for the window Sill fits to this model. And demonstrates how the Grandt Line Door slots into the angled styrene within this model.
The next upcoming post will be covering the 3D Printed Items that I produced which will include the Base and 6 Pane Window Frame for this Weigh Bridge Office.
No comments:
Post a Comment