What Happened?
Well after some great progress shown in my last Blog, I thought that I was going to declare the roof section completed for this particular post.
However, long story cut short, I ventured into soldering of brass, which is new to me.
I thought that I had a bit of that beginners luck on my side where I was able to produce a model of a stove chimney which was in my view as perfect as I could get it.

However, when I tried to fit the Chimney to the roof, the chimney cap decided to detach itself. After several attempts to get right to what it was failed. Therefore I decided to resort for outside help to tutor me on how to solder brass correctly. Full story on the outcome of that hopefully in my next post.
Furthermore, that Game of Life has also got in the way where my work load has increased plus a few other home issues to deal with.
Since my last post, my spare model Rail Time has also been spent on my Model Rail Clubs HO Layout project and I spent a good part of a day at the Forestville Model Rail Exhibition. More on Forestville soon.
But to keep the posts rolling for this blog, I decided to do a random topic posts on Railway modelling which I hope would be of interest.
Weathering Experiment
With one project on the drawing board for 2018, I intend to do a very weathered Kit Bash model of Glenroy Railway Pc1 Station Building.
I have seen several YouTube videos on how weathering was done and I took a particular interest in a method called Rock Salt Weathering.
Basically, you acquire Rock Salt from the local supermarket (or Kitchen Pantry if you have already acquired some), break down the Rock Salt into smaller grains of salt. And place it to one side for later use.
You then apply a base coat colour (most examples used rusty brown red colours for rusting cars). Then wet the surface and apply the salt and soak it. Then wait for the salt to dry up.
Then the final topcoat is applied and once the top coat of paint is dry enough, a toothbrush is used to remove the salt from the model and once completed, you get that weathered rusty look.
I noticed that all examples I saw were done with acrylic paints and I could not find any examples of anyone trying this weathering method with enamel paint. So I thought that I shall experiment this method with enamel paint.
I know what some of you are thinking, enamel paint is oiled base, and oil and water do not mix.
I decided to do a test weathering task to resemble a timber clapboard siding with an aged paint job where the paint is chipping off.
I used a bit of Left over Styrene Clapboard siding and primed it with Tamiya Primer.
I used a grey for a base coat as aged timber has a grey look to it.
It takes a good couple of days for enamel paint to dry. Once it is dry enough, I applied the rock salt on to the areas of the clapboard in which I wanted to have the weathered look.
I then applied the water. This was a bit of a challenge on the basis that the oily painted surface was beading up the water, but the salt was gradually absorbing the water in which resulted in keeping the salt in place.
I wanted to test out Humbrol Light Bluff as potential paint colour option for Glenroy, so I decided to use this colour as the top coat.


2018 Forestville Model Rail Exhibition
My first ever visit to the Forestville Model Rail Exhibition was last year. I was rather impressed with the 2017 show that I made the effort to pay another visit for their 2018 show.
The Forestville Model Rail Exhibition was arranged by the North Shore Railway Modellers Association Inc.
I do like my NSW HO and N Scale prototype layouts, but do enjoy seeing the American and British Themed layouts that were also on show on the day.
It also great to see that Forestville has also had a few point to point type layouts included in their exhibition program.
Also of certain interest, was with a couple of the flyers I picked up along the way for the Casula Hobbies upcoming Z19 Class Steam Locomotive and the Austrians C30T Class steam locomotives, both of which will be in HO Scale.
Z19 Class did run on the Tumbarumba Branch line in its early days of operation and the 30T Class did end up becoming the prime steam Locomotive that was utilised on the Tumbarumba Branch Line. I did notice 3020 is one of the 30T's that is listed on the Austrains flyer which is one of the numbers I desire to have for my Tumbarumba Layout as it was part of a Tour Train that ran to Tumbarumba in the era that I'm modelling. But I did found one issue for me that it is listed to be supplied with a Bogie Tender, whereas the pictures that I have seen of 3020 in the mid 1960's had the 6 wheel tender. I guess it may have been a common practice that a swap between bogie and 6 Tenders may have occurred on a regular basis and perhaps 3020 did run with a bogie tender at one stage. This is by no means having a swipe at Austrians as I'm sure that they would have done their research and have for many years produced great reliable models. I guess I need to somehow work out the solution of some sort if I want to include 3020 equiped with 6 wheel tender into my Prototype Tumbarumba fleet of Locomotives. I'm sure that I will find work around for this. I guess the end solution could end up being a topic for one of my future blogs.
However, on the up side, other 30T classes that ventured down the Tumbarumba Branch Line on the Australians list were 3090, 3142 & 3144 (in the Green Livery). Either way, I have several months to consider on which ones I will select to be part of the Tumbarumba Fleet.
To finish this post off, here are some photos I took at the Forestville Model Rail Exhibition.


Well after some great progress shown in my last Blog, I thought that I was going to declare the roof section completed for this particular post.
However, long story cut short, I ventured into soldering of brass, which is new to me.
I thought that I had a bit of that beginners luck on my side where I was able to produce a model of a stove chimney which was in my view as perfect as I could get it.

However, when I tried to fit the Chimney to the roof, the chimney cap decided to detach itself. After several attempts to get right to what it was failed. Therefore I decided to resort for outside help to tutor me on how to solder brass correctly. Full story on the outcome of that hopefully in my next post.
Furthermore, that Game of Life has also got in the way where my work load has increased plus a few other home issues to deal with.
Since my last post, my spare model Rail Time has also been spent on my Model Rail Clubs HO Layout project and I spent a good part of a day at the Forestville Model Rail Exhibition. More on Forestville soon.
But to keep the posts rolling for this blog, I decided to do a random topic posts on Railway modelling which I hope would be of interest.
Weathering Experiment
With one project on the drawing board for 2018, I intend to do a very weathered Kit Bash model of Glenroy Railway Pc1 Station Building.
I have seen several YouTube videos on how weathering was done and I took a particular interest in a method called Rock Salt Weathering.
Basically, you acquire Rock Salt from the local supermarket (or Kitchen Pantry if you have already acquired some), break down the Rock Salt into smaller grains of salt. And place it to one side for later use.
You then apply a base coat colour (most examples used rusty brown red colours for rusting cars). Then wet the surface and apply the salt and soak it. Then wait for the salt to dry up.
Then the final topcoat is applied and once the top coat of paint is dry enough, a toothbrush is used to remove the salt from the model and once completed, you get that weathered rusty look.
I noticed that all examples I saw were done with acrylic paints and I could not find any examples of anyone trying this weathering method with enamel paint. So I thought that I shall experiment this method with enamel paint.
I know what some of you are thinking, enamel paint is oiled base, and oil and water do not mix.
I decided to do a test weathering task to resemble a timber clapboard siding with an aged paint job where the paint is chipping off.
I used a bit of Left over Styrene Clapboard siding and primed it with Tamiya Primer.
I used a grey for a base coat as aged timber has a grey look to it.

Grey enamel paint used for the base coat.
It takes a good couple of days for enamel paint to dry. Once it is dry enough, I applied the rock salt on to the areas of the clapboard in which I wanted to have the weathered look.
I then applied the water. This was a bit of a challenge on the basis that the oily painted surface was beading up the water, but the salt was gradually absorbing the water in which resulted in keeping the salt in place.
I wanted to test out Humbrol Light Bluff as potential paint colour option for Glenroy, so I decided to use this colour as the top coat.

Bottom half of the clapboard siding being weathered with the Rock Salt Weathering Method. Top half portion not getting weathered.
As you see in the above picture the Rock Salt prevents top coat a reaching to the base coat.
After a day, with use of a toothbrush I removed the rock salt from the model. The outcome of this weathering experiment has proven to me that it can certainly be done with enamel paints.

The weathered look once the Rock has been removed.
My first ever visit to the Forestville Model Rail Exhibition was last year. I was rather impressed with the 2017 show that I made the effort to pay another visit for their 2018 show.
The Forestville Model Rail Exhibition was arranged by the North Shore Railway Modellers Association Inc.
I do like my NSW HO and N Scale prototype layouts, but do enjoy seeing the American and British Themed layouts that were also on show on the day.
It also great to see that Forestville has also had a few point to point type layouts included in their exhibition program.
Also of certain interest, was with a couple of the flyers I picked up along the way for the Casula Hobbies upcoming Z19 Class Steam Locomotive and the Austrians C30T Class steam locomotives, both of which will be in HO Scale.
Z19 Class did run on the Tumbarumba Branch line in its early days of operation and the 30T Class did end up becoming the prime steam Locomotive that was utilised on the Tumbarumba Branch Line. I did notice 3020 is one of the 30T's that is listed on the Austrains flyer which is one of the numbers I desire to have for my Tumbarumba Layout as it was part of a Tour Train that ran to Tumbarumba in the era that I'm modelling. But I did found one issue for me that it is listed to be supplied with a Bogie Tender, whereas the pictures that I have seen of 3020 in the mid 1960's had the 6 wheel tender. I guess it may have been a common practice that a swap between bogie and 6 Tenders may have occurred on a regular basis and perhaps 3020 did run with a bogie tender at one stage. This is by no means having a swipe at Austrians as I'm sure that they would have done their research and have for many years produced great reliable models. I guess I need to somehow work out the solution of some sort if I want to include 3020 equiped with 6 wheel tender into my Prototype Tumbarumba fleet of Locomotives. I'm sure that I will find work around for this. I guess the end solution could end up being a topic for one of my future blogs.
However, on the up side, other 30T classes that ventured down the Tumbarumba Branch Line on the Australians list were 3090, 3142 & 3144 (in the Green Livery). Either way, I have several months to consider on which ones I will select to be part of the Tumbarumba Fleet.
To finish this post off, here are some photos I took at the Forestville Model Rail Exhibition.


Above 2 Pictures are of an American Themed HO Layout called NT Junction. The Exhibition Guide states that this is 2,400 mm x 450 switching layout.

IDR Models stand demonstrating their X200 class and the upcoming 70 class diesel locomotives. Certainly the point to point concept is a great alternative if you have space limitations on where you would like to place your layout.

This Layout is called Bear Ears. The Exhibition Guide states that scenic section is only 600 mm x 300mm.

A scene of Binalong, one of Epping Model Rail Club Layouts.

Birdport South Western Layout.

Uley Junction O scale Layout.


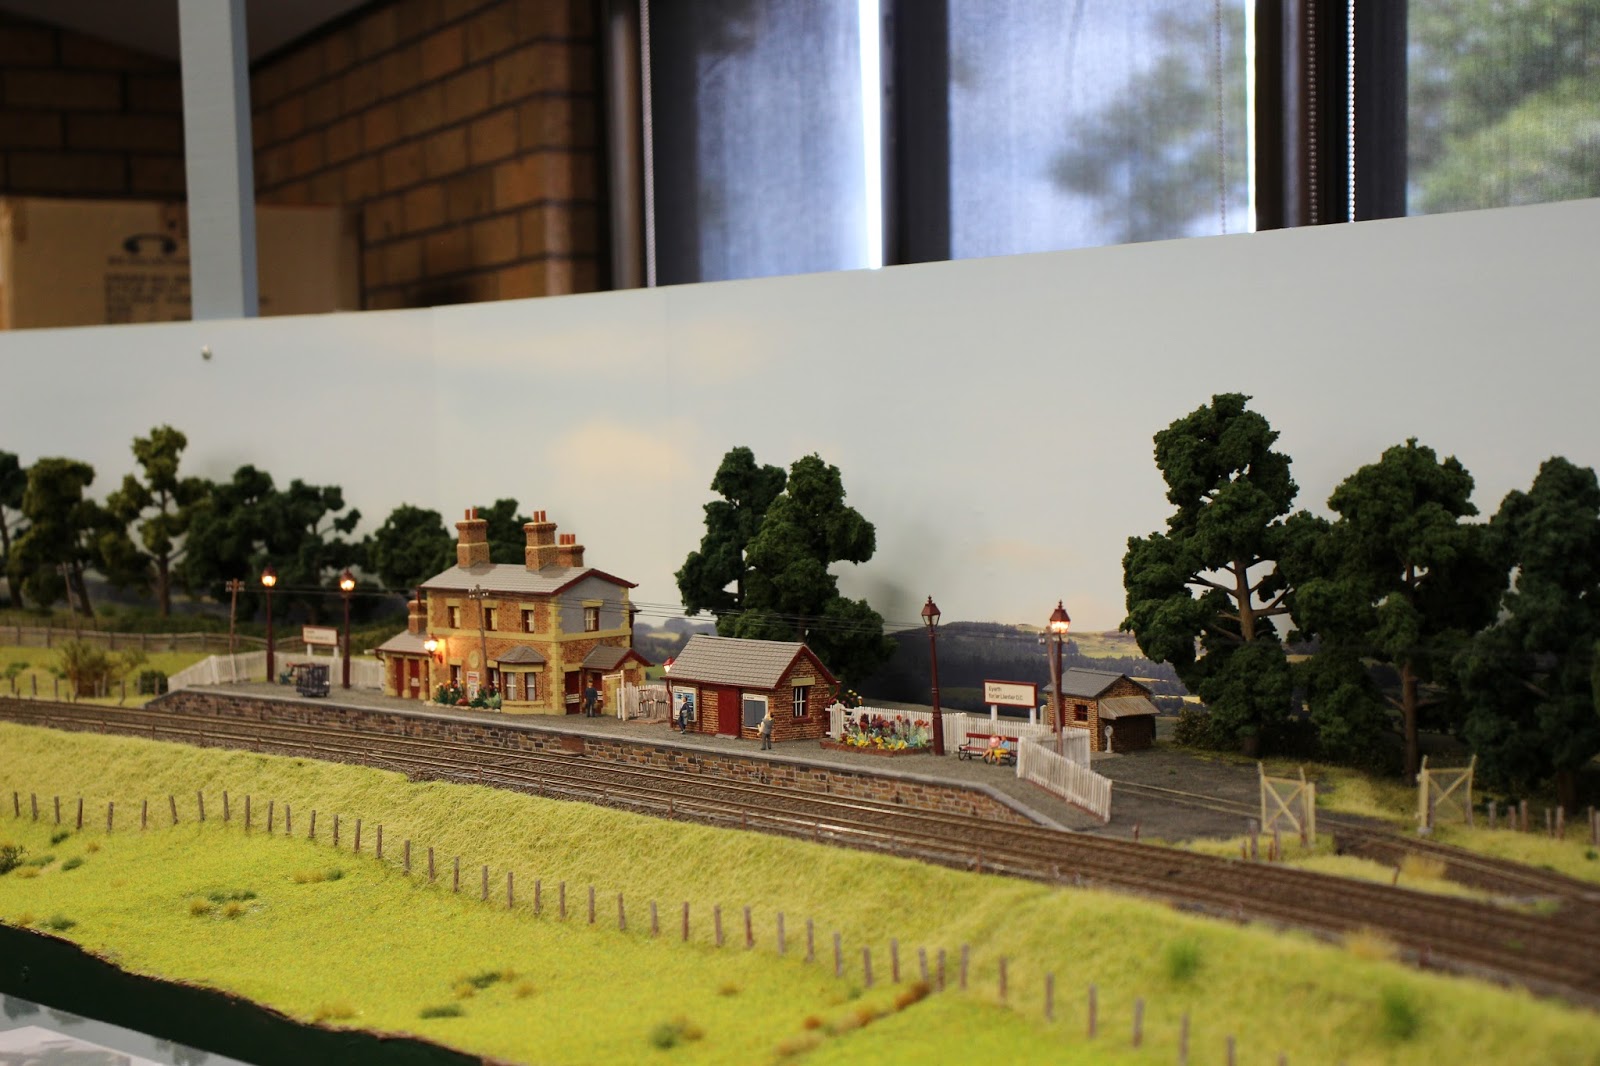

The above 4 photos are of a Layout called Eyarth. This was one the longest point to point layout in the Forestville Exhibition. I have to say that my photos of this layout does not justify how well this layout was presented and operated. I do hope to see it in another exhibition in the near future.