Friday, 9 April 2021

A Quick And Simple N Scale Layout Project

For a while now I wanted to do a N Scale Layout Project. When I started to get serious in the Hobby of Railway Modelling back in 2007, there was very limited ready to run in regards to Australian N Scale, I originally started collecting some American N Scale then later on I started a small collection of British N Scale and over the last few years collected some NSWGR N Scale locomotives and rolling stock.

My interest originally in N Scale came about to the fact when I got Married back in 2007, my wife and I resided in a home that had small rooms that were not big enough (in my view at the time) for a HO scale layout. Furthermore, back then the American N Scale was cheaper to purchase and offered some well detailed ready to run models. 

My New N Scale Layout running trains within the first few days of construction

Recently, Auscission Models have been strongly hinting that they have some N Scale Projects for both locomotives and rolling stock in the pipeline such as a the NR Class with the option for a factory fitted DCC Sound decoder. In fact, a preproduction working sample are currently on show within their Shop. I know these models may not be a sell out in their early days of release, but I foresee that there will be a eventual rapid growth with N Scale as there are many in the younger generation who may not have the realestate for large scale layout and the older generation are down sizing to live in a smaller home that may not be able to facilitate a HO or Larger scale layouts. I know some of my readers here will joke about not able to see N Scale as there eyesight is not that good enough to see the model, but working on N Scale exhibition Layouts in the past, we do get a lot of inquiries from the older generation with the desire to downgrade from HO to N Scale. As well as younger folk enquiring on how they can get a start into Australian N Scale.

Now for this Quick, Simple N Scale layout that I have just constructed.

The N Scale Layout Idea

It started with a conversation with Robert P (N Scale Railway Modeller), who said that I could construct a quick and simple N Scale Layout within a few weeks. With some leftover material from my HO Scale Muttama Project and some from Narellan, I felt it may be good to go ahead and do this N Scale layout Project as it will not become a big cost for me in doing so. All that I really needed to purchase was a back scene, some point motors, DC Controllers and some timber for the Framework of the layout. I already had plenty of N Scale track and points that was needed for this project.

Further to this I have done a few NSWGR Lineside structures 3D Printouts in N Scale a few years back that have been waiting to be painted and plonked onto a layout.

Construction of This N Scale Layout

I wanted a simple track plan and simple but effective scenery as this is more of a layout for the enjoyment to run trains.

I wanted to make the layout in a modular setup that it can be easily stored in a cupboard when it is not in use and be able to sit on top of a fold out table.

Frame work for the Base boards which consists of four modules in total. Notice that the end modules bracing are in line with the width of the main scenic module to allow mounting of the back scene board.

One of the end Modules in a near completed state. Notice the slot to allow the back scene board for that module to fit in.

Scenic and Fiddle yard modules completed.

 3mm Portugal Cork has been applied to the main scenic module and the fiddle yard module to allow for the Kato Track to match the height of the Peco track.

Track work has been laid down. Peco Code 55 N Scale track has been used for the straights and fiddle yard of this Layout. Kato Uni Track for the curbs and the interfacing track to the modules.

Landscaping

The Landscaping of this layout is simple. I took the Less is More approach, only adding in the Bridge the Platforms of the station and some hills. I will again take advantage of the Haskell Back Scene (Themed; Dry Country) to do the most of the scenic effect. The Bridge and the Platforms will be scratched built and the Hills will be carved out from insulation foam that I purchased from Bunnings Warehouse.

Haskell Dry Country Back scene applied.

Road Bridge in its early stage of construction. The Bridge need to be constructed so to properly determine the landscaping profile around it.

Almost completed Platforms are placed on the Layout.

The Landscaping of the Hills and cuttings begin.

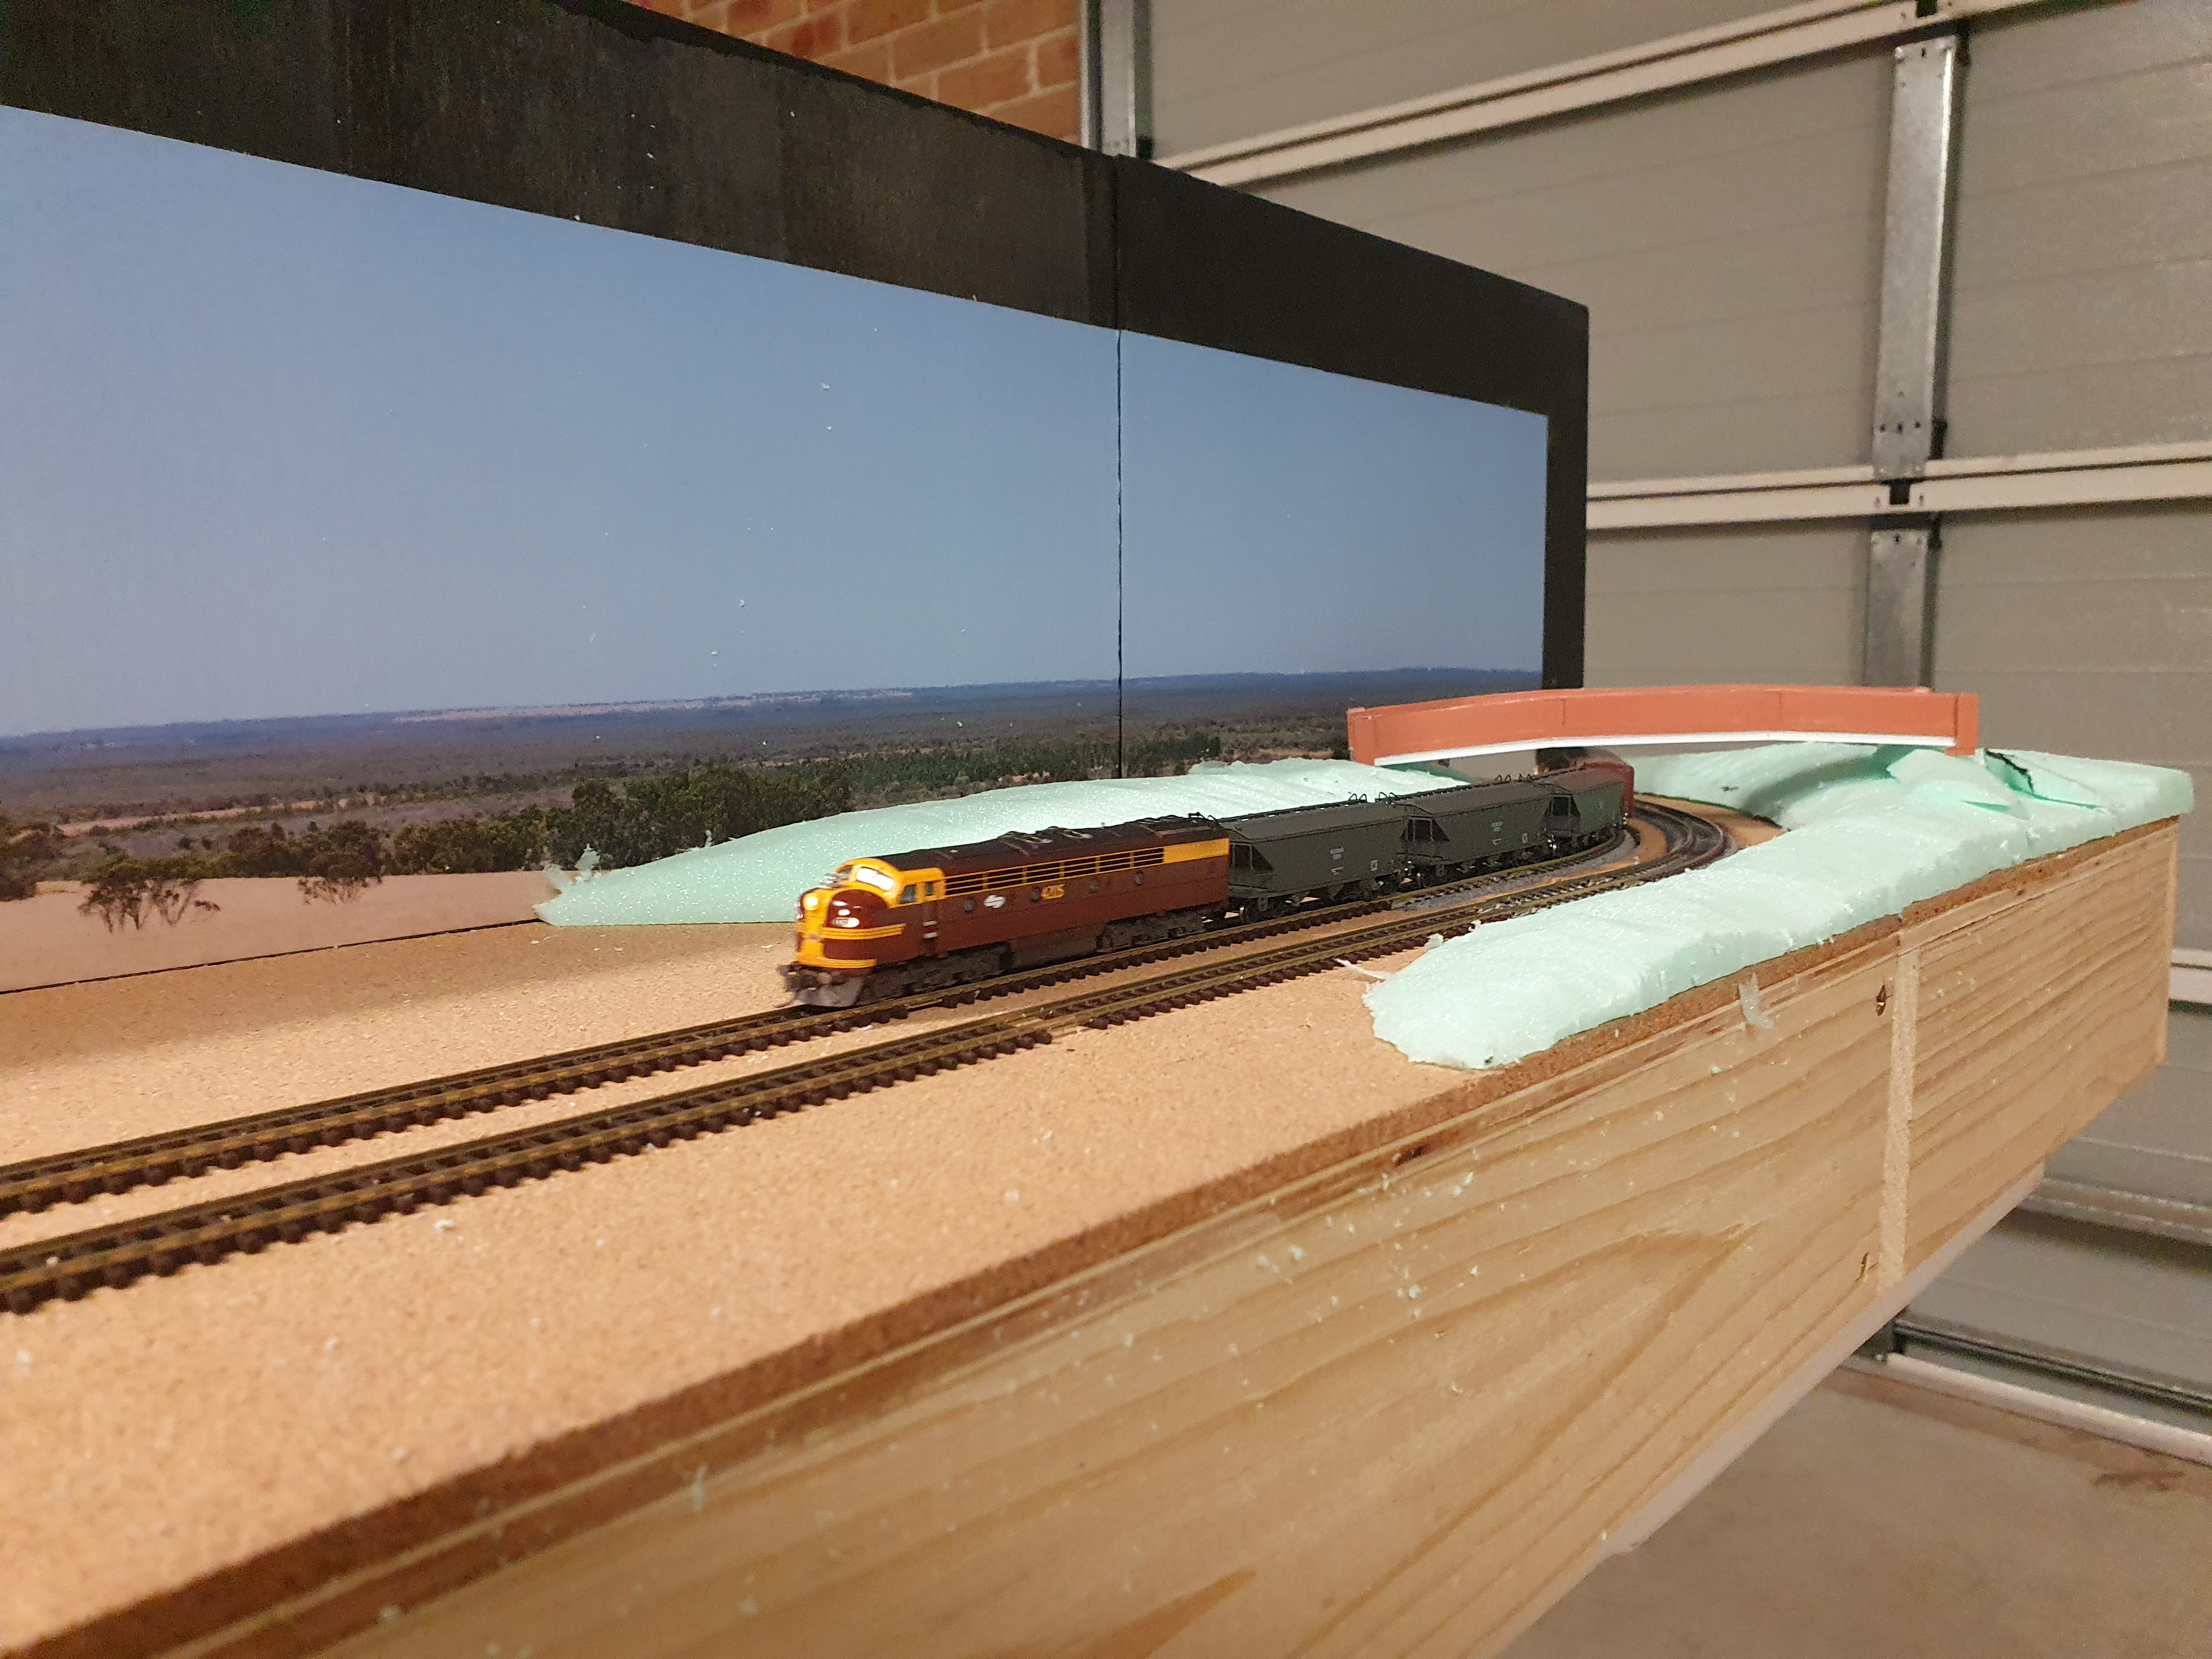
Running Trains to determine what refinements are needed to ensure that the landscaping is not going to impact the smooth running of trains. 

I later found out I got too carried away with the landscaping and took out more foam than what was needed. Not a problem, just need to correct it. It will be all covered up with plaster cloth later on.

Landscaping on the other end of the layout.
 
Plaster Cloth has been applied.

I applied wet tile grout (I used Davco Cornsilk colour Grout from Bunnings Warehouse) and dabbed on the Grout with a large paint brush.

I applied Woodlands Scenic Turf. In this case I used a blend of Yellow Grass and Burnt Turf Grass. The Dirt was simply top soil that was collected in Southern NSW.

Turf and Dirt applied.

Using a strip of 3 mm Portugal Cork off cut, I used form the road. Applied Selleys Spakfilla on the road and some of the embankment around the area where the bridge resides. Spakfilla is not the easiest to apply, but it allows you to clean up any area that may have accidentally been applied on the area of the model. It eventually sets hard and any rough bits can be easily sanded. 

Once the Spakfilla is dried up, I then applied wet grout over the areas that the Spakfilla was applied.

After the Grout dried up, I then applied some more Spakfilla to level out the road at the edge.

Static Grass was applied. I used various ranges of static grasses to try and get the tone that closely matches the back scene. I also laid down the ballast after the static grass work was completed.

I applied the Woodlands Scenic Gravel (which was left over Gravel from my Muttama Project) and once dried coloured with soft artist pastels and blended it with a soft brush to get that dirt road effect. Also notice that I have put in some trees that were meant for Muttama, but seem to be more appropriate size for a N Scale Layout.

Woodlands scenics fine light grey ballast was put in place on the platforms. Notice the 3D Printed passenger Waiting sheds that will eventually make their way on the layout.


Jindalee

I have named this Layout Jindalee as it is model on a location similar to Jindalee, which originally had two small platforms with waiting sheds and a road bridge. However, I was not aiming to make it a scale model of Jindalee but more of a representation of it. The main reason for this is that I had most items in my procession to complete this layout without needing to spend months of modelling and it meets the objective of providing enjoyment of just running trains. This layout is now at operational completeness, However, still some other items and enhancements on the way to completed this layout. But for now, I can enjoy running trains on it.

N Scale Layout now in the Train Room. My HO Layout of Narellan is now safely stored underneath.

Close up on the bridge.

View on the down direction.

View on the up direction.

Jindalee layout Dimensions when all modules are joined is 190 cm x 80 cm.

I will do a separate blog on the Bridge, as the bridge build was a bit more involved and the most time consuming part of this project. 

Now for the twist in this build that made me complete this layout to the point that it can be exhibited.

An Invite To Have Jindalee Exhibited for The Diamond Creek Easter Train Expo

With only a week before the Diamond Creek Easter Train Expo at Diamond Creek, I was asked to bring down Jindalee. This meant I had to complete Jindalee to be at Exhibition Standard, basically meaning it needed to be in a completed state. It needed facias cut to fit that edging of the layout to not only give the layout a neat finish but also to protect the landscaping on the edge of the scenic sections of the layout. Station Buildings needed to fully constructed and painted, Station Signs to be constructed and painted and more trees needed to be put in place. Also a lighting solution needed to be installed.

I did not take too many pictures as I needed to focus on getting this layout finished.

Lighting solution was a couple of Arlec 20 Watt LED Lamps.

Station Sign was built with 3.2 mm wide by 0.5 mm thick styrene strip with Slaters N Scale platform lettering. MEK was used to adhere the lettering to the styrene strip.

Applied 0.75 mm x 0.5 mm Styrene Strips to the edge of the Station Sign.

Stations Signs painted white and used a Sharpe Texta for the black border and black lettering.

Station Buildings and Signs finally attached to the layout.

Jindalee made it safely intact from my home in Sydney to the Diamond Creek Easter Train Expo which is located around the Northern Suburbs of Melbourne. Other than a bit of dirty track that needed to be cleaned up, all trains ran without issues.

There could of been so much more that I could have added to this post, but I did not want to make this one into a novel. May touch on more of Jindalee, the Kaleen and Diamond Creek in an upcoming blog in the very near future.


Wednesday, 31 March 2021

32nd Canberra Model Railway Expo And Another Announcement

Last Weekend saw the first Model Rail Exhibition within NSW/ACT Since the COVID Restrictions forced the cancellations for the 2020 Exhibition Schedule. For me it was the second event to support the showing of my Model Rail Club HO Scale Layout of Wingello. Further on in this Blog, I have another announcement I would like to share.

Wingello on Friday Setup.

32nd Canberra Model Railway Expo

For me personally, this has been the first time that I have attended this exhibition and I have to say I was very impressed with this event. Furthermore, there were a lot of high standard layouts at this event which was great for the return of the first of the model rail exhibitions within NSW/ACT. This was also the first event within NSW/ACT with a COVID safe plan which seem to have functioned well. Well done Canberra Model Railway Club Inc for putting on a great show.

Wingello with 44232 with the return Passenger Service From Canberra. I recently weathered this Austrains 442 for this event.

44 Class approaching Wingello Station on the Down Line.

Rob P N Scale Layout of Gunning.

Guilford Model Railway Group HO Layout of Goulburn had plenty of activity happening.

Wingello Voted the Most Popular Layout

One of the main highlights four myself and my other Club Members is Wingello receiving the Most Popular Layout Trophy. This Trophy is awarded to the Layout which receives the most votes by the public. I would like to Thank those for taking the effort in putting in a vote for one, but also voting for Wingello. We are not out to try and win awards, but we are there for the fun of it and to promote the hobby. But any model rail layout project does take a lot of effort to construct and these awards give us a positive feeling that this project was worth the effort, especially being a smaller club compared to the others. 


Most Popular Layout Trophy awarded to Wingello. Another trophy to pin up to the Clubs Trophy Board.

The other two Trophies which are decided by the Judges were awarded too:

The Best Layout at Show: Ettamongah Freight Hub

The Best Scenery Layout: Eborvale

Happy to be stand corrected if the naming of these awards or awarded layouts are incorrect as I'm relying on my memory bank here.

Announcement

I was going to do full blog on this Layout Project Build within a couple of weeks time on the build of this N Scale Layout, but a positive circumstances that came forward and the transportation arrangements means this Layout is going to be on Public Display at the Easter Train Expo at Diamond Creek this coming weekend. Details of this event can be found in my last blog.

This N Scale DC powered Layout has been more of a build aimed at running my NSWGR N Scale locomotives and rolling stock in my allocated train room with the aim of keeping a simple scenery approach and a build that would take little time to complete. As it has happen, the construction of this layout has taken 5 weeks to get it to its current form. Still a few items left to get it to the scenery fully completed. Im just waiting on some more scenery to come in.

I have been asked to bring down this layout to the Diamond Creek Exhibition this weekend and I will be traveling down with Rob P and other Support Crew Members for the running of his N Scale Layouts of Gunning and Gunbower.

The name of my N Scale Layout is Jindalee, which is based on the area of Jindalee (which is located near Cootamundra, NSW), but as this was more intended to be a layout to run at home, It was not really intended to be an exhibition layout, but its up to Exhibition standards.

Hopefully, exhibiting Jindalee will show those who want to get into hobby of Model Rail that you can build a small but effective layout within a short period of time. More on Jindalee in my next blog.

Sneak peak of Jindalee Ready for Exhibiting at Diamond Creek Easter Train Expo.


Monday, 22 March 2021

2021 Model Rail Exhibitions


It has only just been a Year ago since NSW had a Model Rail Exhibition which was hosted by the North Shore Railway Modellers Association INC at Forestville. From what I recall it was a week after this event that the restrictions to prevent the spread of COVID 19 were put in place which cancelled out the remaining model rail shows in Sydney and Country NSW, also impacting on other events in other states of Australia that were planned in 2020. 

The good news is in 2021 we are starting to see some of these events gradually reappear with a full commitment to go ahead if there are no local COVID19 spread within the community. However, it should be expected that not all of the regular model rail events are going to eventuate this year due to mainly not knowing well in advance what the limitations that are in place when the event is schedule and if hosting the event would be viable based on those limitations. Furthermore the financial losses to clubs if they had to cancel an event due to a COVID outbreak. Unfortunately, it was recently communicated that the Epping Model Model Railway Club Great Train Show that was planned for the June Long Weekend has been cancelled for this year.

As mentioned in my previous blogs when I have knowledge on when either any of My personal Layouts or My Club Layouts are going to be exhibited, if permitted, I will announce it on this blog page.

2021 CMRCI Model Railway Expo 27th - 28th March 2021

First of All, good to see that the Canberra Model Rail Club Inc are going to be one of the pioneers in hosting a Model Rail exhibitions in these exceptional times. The location of this event will be at The University of Canberra High School Kaleen, 104 Baldwin Drive, Kaleen.

Im am pleased to announce that Wingello, My Model Rail Club layout will be exhibited for that weekend. 

Testing out the Platform Lights for Wingello in getting ready for the CMRCI Exhibition

Here is a link to the CMRCI Bulletin for more details on the event itself.

http://cmrci.info/wp-content/uploads/2021/02/The-BULLETIN-March-2021.pdf?fbclid=IwAR3QLzulXClerr6e2lKEQ0y_sWzgpmzrLWuEEP0fqRaVt2lGKIc29MEmoJc

Fingers crossed that we have no COVID events that prevents that show from going ahead. 

Easter Train Expo 2021 3rd - 4th April 2021 (Victoria)

The Easter Train Expo is set to go ahead during the Easter Weekend. The location of this event will be at the Community Bank Stadium 129-163 Main Hurstbridge Road, Diamond Creek (Victoria). 

All I can say at this moment that I will be supporting one of my model rail friends layouts in this event. 

Again, let's hope no COVID events come along that prevents this Exhibition from happening.

Let's hope some more Model Rail events do get planned to go ahead throughout the year.


Saturday, 27 February 2021

Applying A Back Scene On Your Layout

From my previous blog, I mentioned that I replaced the Haskell Back scene due to its lost of adhesion on the back scene board. I do want to make it clear that it is not an issue with the Haskell Product, but on what needs to be done first before applying your back scene picture regardless if it is a Haskell Product or other adhesive Back Drop picture product.

This is a blog from my learning from experience on applying a Back Scene, the problem I encountered and the solution. I simply want share this so that others can get it right at the first attempt.

I found that I and other Model Rail Friends of mine have experienced the issue of self adhesive back scenes basically bubbling up after a hot day and loosing its adhesion on the back scene board. However, the problem that causes this has been worked out and the following is what I have done to overcome this issue.

The Problem

The Problem started when applying an enamel gloss paint that was in the paint to clear bin at a cheap price at Bunnings Warehouse (basically paint that was mixed behind the counter). The gloss in component in this paint would aid the adhesion when applying the back scene to the back scene board, but in this case it seems that this pot of paint may not had the needed volume of gloss mixed into the paint to make it work for this purpose. Before placing the back scene on the back scene boards, I did apply some spray on adhesive with the thought that it would help fully secure the Back Scene on the Back Scene Boards. All was good once it got applied and then installed into the layout.

Then one day there was a hot day that made the Back Scene bubble up and started to detach itself from the back scene board. 

My back scene before the replacement work was carried out.


I consulted with other model rail friends of mine who advised me they had faced the same issue.

As suggested to me, I was able to fix some of the issue up with putting the layout out in the sun for a sort time which did fix the issue for one of the modules but the other module seem not to have responded well. After hearing of the solution that works, I decided to acquire another back scene and start over, this time providing some step by step directions to apply the back scene successfully.


The Solution

Note, This following task was done on a Sunny 27 Degree Day during January (Middle of a Sydney Summer).

It is recommended that this task gets done on a warm sunny day as you will find out the reason why a later on.

First of all, get a tin of Enamel Gloss Paint, in this example I have used a Black Gloss Enamel Paint. Safest bet is one that has been premixed by the Manufacture ready to use.

Tin of Black Gloss Paint that I will be using to apply the Back Scene Boards.

Apply the Enamel Paint paint on the Back Scene Boards.

Back Scene Boards painted, also painted the front facias of my Narellan Layout

When the paint is touch dry, set up the Scene Boards and line up the Back Scene picture to the Boards. In my attempt here, I cut up the back scene where the two modules meet up. This did make easer for me to apply the back scene later on.

Once lined up, I suggest that you start on the ends where the two modules are meeting up to ensure that that they properly line up and take your time applying the Back Scene Pictures on each module Back Scene Boards.

Lined up the back scene pictures with the back scene board and secure the final desired placement with pegs and other objects that have a reasonable weigh to prevent movement of the back scene when the initial stages of applying it to the boards is carried out.

At this point remove all of the pegs after the first quarter portion of the back scene has been applied. The rest of it should be easily placed square on the board from here on in.

I found a spent Netflix card which used along the way to help fix the back scene to the back scene board.

Once applied you will already notice some air bubbles starting to form. 

To solve this problem take the module outside exposed to the sun. It only took a minute for the back scene picture to bubble up. Don't panic, this is a good thing as the heat from the sun seems to reactive the adhesive in the Back Scene Picture.

Bubbling effect started within a minute in exposing it to the sun.

From here, you get a firm enough but flexible card (again with spent Netflix Card) and smooth out the bubbles. Please note, that the Haskell back drop pictures are robust due to a highly protective covering and you will not cause any damage to the picture.


Back scene looking well set in the back scene board.

You will find that there are some bubbles that will be stubborn and will not go down by pushing down on them. To solve this, I uses the point of my hobby knife to create a small hole which released the from the bubble. The good thing is not only you remove the bubble, the small cut you make to remove the bubble disappears as well.


Unfortunately, I did not photograph a good example of one of those stubborn bubbles, but photographed the sky portion of the picture which did not pick up too well. But, there was a bubble there, used the point of a hobby knife to remove the air that was trapped. No evidence of the slight cut in the area where the bubble was removed.

Remove from exposure from the sun and place the Back Scene Boards in a cool area.

Back Scene Boards are ready to be installed on the layout back onto the layout.

Backscene Picture replacement task completed successfully.

To Sum It All Up

Basically the gloss enamel paint with the shiny surface helps the adhesion of the Back Scene Picture to stick to the Back Scene Boards. The heat of the sun is reactivating the adhesion from the Back Scene. The drying gloss enamel paint together with the Back Scene will create a strong bond to one another. 

I have also been advised by others that this can be done with a hair dryer or heat gun, but I personally like the sun method on the basis that it does consistently heat up the back scene.

After good Month in the Garage where there has been few hot days, the Back Scene picture has managed to stay stuck on the back scene board without bubbling up or detaching itself from the back.

I hope this helps others out in applying a back scene for their layouts.

Next blog will be hopefully ready in the next couple of weeks. All I will say is that there is going to be something exciting to look forward to.


Friday, 5 February 2021

HO NSWGR Exhibition Muttama Layout Build January 2021 Update

Over the Christmas period into January, I had manage to score two and a half weeks off from work and made the wise decision to stay at home during this time as it rained for the most part of it and a COVID scare in Sydney which came with some restrictions. This resulted in a fair bit of Railway Modelling done on Muttama and also managed to get some needed repair work done on Narellan in the hope to get it into some exhibitions if they do eventuate at some point this year. 

January has been a very productive month. Let's first start on Muttama Station Building.

Muttama Station Building
The next Line Side item I elected to construct is the Station Building of Muttama Railway station. This station building was an early days type wooden structure which that consisted of a fancy wooden curtin at the entry of Waiting Room and contained an office presumably for the Station Master. Outside of Muttama, there where several of these types of buildings on the NSWGR network to the likes at the Neighbouring station of Brawlin, Bunyan on the Bombala Branchline. This type of Station Building was also seen on several locations on the Illawarra line such as Heathcote and other variations that still exists today at Dunmore and Bombo. However Bombo has been modified which resulted in the unique waiting room curtin at the entry being removed. Basically it seems that many of these early day buildings either got replaced by a later version of a Station building or in the case of Heathcote destroyed by a fire and replaced with a more modern brick structure.

Fortunately, I was able to find plans for Muttama Station Building at the NSW ARHS Resource Center (before the COVID Restrictions started last year). I also found a couple of photos of Muttama Station Building, which had shown some slight variations as to what the plans presented. One example was the placement of the windows for the Waiting Room and the other being the back half of the building being built into the slop of the landscape. Luckily for me, the photos presented me with a more easier build option in which I was keen to follow as the final reference.

Instead doing a comprehensive blog on how I constructed Muttama, here are some photos on its stages of its build. I will make notes on a couple of them to state why I did the way I did it. 

As always I start on building a corner section of the structure. I did the corner portion that is pictured above as the other corner portion will need to integrate the brickwork of the Fireplace.

For the wall where the Fireplace Brick work will be placed, I partially cut out a section to ensure firstly there the cutout that was able to fit the 3D Printed Fireplace but once MEK onto the first corner portion, I can cut out the rest of the wall to allow the Fireplace to fit.

All four walls are all joined up, it is now remove the remainder section of the wall where the Fireplace is to be installed. I would also like to point out that section of floor needed to be cut out in order install the 3D Printout of the Fireplace.

A bit of a test fit on all the windows, Door way frame and other 3D Printed Items. The Wooden Curtin for the waiting room, front windows and the  Fireplace are 3D Printouts.


Most of the main structure of the building is completed. Now onto getting the additional detailing completed.


Skirting on the base of the building, awning supports, guttering another minor detailing parts added on.

Painting Muttama Railway Station
First point to cover off was to determine the colour that Muttama may have been. It would have been likely it would have have been painted several times in different colour during its days in production. The only colour clue that was available was from a book Country Branch Lines New South Wales - Riverina District which had a colour picture of the Gate Keepers Cottage. After doing a bit of looking around I found that the primary colour resembles to the colour of Couridjah Station Building which is preserved on the Picton to Mittagong Loop Line.


Couridjah Station Building colour example

I have decided to try out the SMS Range of paints as they are for one locally produce in Australia. Recently, obtaining paint colours from international based suppliers been hard to get hold of. I have also heard of a lot of good reports from other railway modellers on how impressed they were with the SMS Paint Range. Also the paint range seems to include a decent selection of colours that are a match or closely match the colours that were used to paint NSWGR Line Side Structures.

For the Case of Muttama, I chose to use Light Stone as the main colour. White for window frames, door frame, facias and waiting room curtin entry. Dark Brown for the colouring for the guttering and lining on the part of some of the facias, door step and the steps for the waiting room entry. And Mid Stone for the Door and some of the internal detailing. From my research, it seems that three combination of colours would be used on station Buildings on the NSWGR network with four combinations of colours on a few cases. In the case of Muttama, I decided to use the four above mentioned colours as the Dark Brown was painted on minor items, but has help greatly in bringing up the finer detail of this model which could have been easily been overlooked if it was just white in colour. The Brick work is painted in a US Pale Brown colour and the mortar has is SMS White Pigment which has been fixed in placed with a Dull Coat.

Now for the result of the paint job and what are my final thought on SMS Paints?


Main paint work completed with only needing to do the painted lining to show where the corrugated roof sheets met up and weathering on the Chimney.


My final thoughts on the SMS Paint Range is highly positive. They are an acrylic lacquer based paint which meets in the middle when compared between acrylic and enamel based paints. It has the advantage that paints smoothly via an air brush on the model and very quick to dry like acrylic paints do. The paint job is just about as robust as an enamel based paint. Furthermore, I found it was also easier to clean the airbrush after using this paint compared to other paint brands.

As I mentioned earlier, these are locally produced paints and the colour range (which seems to be expanding in colour options) are very close if not a match to the colour schemes that were used on the NSWGR network and it is worth noting for the Victoria Railway modellers that SMS does a V/Line Grey and Orange colour. A couple of years ago, Humbrol discontinued their Mid Stone Colour (Humbrol 225) which is a common colour for the Heritage colour scheme which has been used on many of the remaining Heritage Buildings in NSW. SMS Paints have now filled in this void with Mid Stone colour within their range.

Ensure when you do use SMS Paints that you use the air pressure that is recommended on their bottles which is 5 - 15 PSI for the best outcome. 

I will be certainly using SMS Paints from here on in.

Fixing Up Narellan For Upcoming Model Rail Events
Even though Narellan has only been to one event, there are a couple of minor issues that I have come across that needed to be resolved before they become a bigger problem. 

The First issue was scratches on the paint work of the facias of the Modules that was caused in the transportation of Narellen to the Forestville Exhibition. The Second issue was with the Back Scene detaching it itself from the Back Scene Boards.


In the above two pictures shows the bubbling up and lifting effect on the back scene picture, mainly where the back scene pictures join up.

To address the first Issue, I decided to paint the front facias with an Enamel Black Gloss Paint. Even though I liked the Matt Black Finish, Im hopeful the that the Enamel Gloss Black finish will be more resilient and be less prone to be scratched due to the gloss finish. In saying that, I will also need to put in better protection between the modules when they are being transported.

Enamel Gloss Black Pain has been applied

For the Back Scene issue, I decided to write up a separate Blog dedicated to this topic, as there is a method that should be followed in order to ensure that the Back Scene picture properly adheres to the Back Scene Board. This Blog Post will be posted within the next couple of weeks.

Either way, the Back Scene boards needed to be removed and with careful removal of some of the wooden frame work that holds in the Back Scene Boards. I was able to remove them without causing damage to the main wooden Framework. Fortunately there was no major damages done on the scenic sections to Narellan other than a bit of wooden fencing which can be easily replaced in an evenings work.

After the surgery that was needed to remove the Back Scene boards.

Replacement Back Scene successfully attached to the back scene boards.

Next Blog post will be dedicated on how to best apply your back scene on your layout.

Thursday, 7 January 2021

Reflecting Back On 2020 And What To Expect In 2021

I would like to firstly wish everyone a Happy New Year and hope that 2021 starts to deliver better times ahead. 

To get the disappointing stuff out of the way first, COVID19 had impacted us all in one way or another and as far as most Model Rail Events such as Exhibitions and Conventions, the vast majority were cancelled as part of the overall Government directives to suppress the spread of COVID.

Early Stages of the my COVID19 Project Muttama

2020 In Summary
In early 2020, I have received expressions of interest and had discussions with the various Model Rail Exhibition Coordinators which was to result Narellan to be exhibited at upcoming events that were scheduled throughout the year. I was fortunate enough to get Narellan's first Public showing at Forestville hosted by the North Shore Railway Modellers Association Inc back in March of last year. I would like to thank them again for giving me the opportunity to exhibit Narellan. I have to say looking back it was great to have exhibited Narellan at the Forestville Exhibition as it was only within a week or two from that event the COVID restrictions started to be enforced which has resulted the cancellation of every other planned Model Rail event for 2020, well in the case of the state of NSW. 

Narellan at the 2020 Forestville Exhibition

My Model Rail Club layout also had a few exhibitions scheduled for club layouts to be exhibited in 2020 that was also impacted by the COVID restrictions.

This resulted me in having a revised Plan for 2020 where I decided to start on a new Project which is a HO Scale Layout of Muttama. I started this project back in April 2020. I decided to do Muttama with the view that the down time and the potential lockdowns restricting movement caused by COVID that it would be practical timing to build another exhibition Layout. For the first couple of months into the Muttama Project I was making great progress until June when my Father's battle with Cancer started to take the turn for the worst which took a hit on the progress. Sadly, My Father lost his battle with Cancer in July 2020 and it was not until November 2020 I was able to gradually get back into the routine in Railway modelling which Im glad to say that progress is stating to get back to the pace to where I was when I started this project.

This also impacted the other smaller projects I had intended to do for 2020, but I plan for these smaller projects to get carried over to my 2021 plans.

If there is any silver lining, I did get my model rail supplies for Muttama before most of the materials got sold out as there were many people globally who opted for building model rail projects as their lockdown stay at home activity. Good to the fact my progress was not hindered by the lack or waiting on materials during this time and good to the fact that hobbies like Railway Modelling started to become a popular again as a result in these unprecedented times. 

Locally, from what I have heard from my other Model Rail connections, there are a couple of interesting layouts intended for exhibitions under constructions which is again is going to be good thing to look forward to when the Model Rail exhibitions start up again, whenever that will be.

Plans For 2021
Reflecting back on the previous plans for the year, not all plans get achieved and some instances other projects that are not on the plan get carried out in place. So I will make the following my plan of intention.

Narellan
Get Narellan and locomotive and rolling stock ready for potential 2021 exhibitions. Also make continual enhancements to Narellan where appropriate.

HG Wagon Kit bash for Narellan


Muttama
To complete Muttama and prepare all locomotives and rolling stock to be ready to exhibited by the 3rd Quarter of 2021 (provided Exhibitions commence again). Muttama will be a different layout to Narellan but hopefully will be one that will be appealing to look at.


Tumbarumba
Not that I have abandoned Tumbarumba, but I have no plans to do much to Tumbarumba in 2021. Over the last year I did manage to draw up and 3D Print the Station Sign for Glenroy Station. This is not to say that nothing is going to be done to Tumbarumba, but I may get some line side structures build up so they can just be plonked onto the layout gets constructed at a later time. Basically, there are some other smaller model rail projects I intend to complete first.

3D Printed Sign for Glenroy Station


N Scale Projects
I still intend to do a small Victorian N Scale Layout of Boolarra which I have done most of the 3D Printouts for the line side items. Hopefully time will permit me to do this layout project in 2021.

Other Projects
Plans can vary which may mean they don't happen or they get done or other unannounced projects get carried out instead. This may vary due to circumstances that allow me to do more projects or prevent me from doing doing what I have planned.

Blog Posts Frequency Expectations
As per usual I will keep posting up a blog at least once a month.

Well 2021 is off to a good start which will be reflected in my next Blog post.

A picture of the current progress on Muttama Station Building