To start this post off, I would like to highlight a few points on the Rail Central Kits range that will hopefully point out clearly on why modifications on the roof section of the station building are needed to make it prototypical to the one that was once at Tumbarumba and other NSWGR Pre Cast concrete Station Buildings.

First main point is that all Rail Central models are of the low pitch roof profile. The low pitched roof Pc Buildings did once exist on the Coolah and Rand Branch lines. If you are thinking in doing a prototypical Layout on any stations on the Coolah and Rand Branches, then you may not need to modify the roof gable or the the roof section at all. But for the others, then you may want to consider the approach that I have taken to make high pitched roof modification.
The Pc1 and Pc2 kits come with Corrugated roofing. Some of the Pc Building did have Corrugated Fibro or Iron roofing or later on had the Fibro Tiles replaced with corrugated Iron.
The Pc3 Kit is provided with the Fibro Tile roofing for the low profile pitched roof.


Before going into the details in modifying the roof of this project, lets look at a roof of an existing example of Bombala (NSWGR Standard Ac4 Station Building), which has the high pitch roof profile similar to Tumbarumba.


I then did another test assembly of the roof section just to see how it resulted. To me, the Squares Styrene sheeting for the Fibro Tile Roofing was the best choice.
I will cover the roof capping and the Finnel portion in a future blog as it will fall into a category of a more modern form of modelling.

First main point is that all Rail Central models are of the low pitch roof profile. The low pitched roof Pc Buildings did once exist on the Coolah and Rand Branch lines. If you are thinking in doing a prototypical Layout on any stations on the Coolah and Rand Branches, then you may not need to modify the roof gable or the the roof section at all. But for the others, then you may want to consider the approach that I have taken to make high pitched roof modification.
The Pc1 and Pc2 kits come with Corrugated roofing. Some of the Pc Building did have Corrugated Fibro or Iron roofing or later on had the Fibro Tiles replaced with corrugated Iron.
The Pc3 Kit is provided with the Fibro Tile roofing for the low profile pitched roof.

Above is the low profile gable roof that is supplied with the Rail Central Kits compared against the Greg Edwards Data Sheet B27 for the low pitch version of the Pc Buildings. As far as I can see they are prototypical in design.

Above is the low profile gable roof that is supplied with the Rail Central Kits compared against the Greg Edwards Data Sheet B27 for the High pitch version of the Pc Buildings. Hence the modification work is needed to make it prototypical.
Before going into the details in modifying the roof of this project, lets look at a roof of an existing example of Bombala (NSWGR Standard Ac4 Station Building), which has the high pitch roof profile similar to Tumbarumba.

Picture that I took of Bombala Railway Station back in January 2006 from the Foot Bridge.


Roof on Bombala January 2017 still contains the orignal Fibro Tile Roofing, roof capping and Finnel.

View of the Fascia where it meets up with the Pre Cast Concrete section of the main body of the building.
Now moving on with the the kit bash, here are the options that I was taking into consideration.
First step was to determine how I was going to make the roof section for the Tumbarumba station building.
Option 1:
Aquire the Rail Central Pc3 Kit which contains the Fibro Tile Roofing.
Conclusion:
Expensive option if you where going to just use the Roofing but not the rest of the kit. But if cost is not an issue, it would only be suitable for the Coolah and Rand Branch Pc Buildings. My feeling for the conversion from low pitch to high pitch roof may encounter a few modelling headaches.
Option 2:
To make use of roofing sheeting that is on the market to achieve the look of Fibro Tile Roofing.
Conclusion: There are a couple of products that are available such as the Vollmer Roof Panel sheet or the Evergreen Tile 4.2 mm (or 1/6") Squares Styrene sheeting (Item Reference: 4504).
Vollmer sheeting does have a realistic look good, however the tiles are a bit small for my liking and the sheet is thick, but certainly earns a honourable mention. The 4.2 mm Squares Styrene sheeting looks closest to the Fibro Tile Roofing effect that is trying to be achieved here.

Vollmer Roof Panel Sheet on the left and the Evergreen Tile 4.2 mm (or 1/6") Squares Styrene sheeting (Item Reference: 4504) to the right.
So, I decided on Option 2, to adopt the 4.2 mm Styrene solution based that it was the closest to the Fibro Tile profile that I was after.

I needed to trim off where the gable extrudes out to line up with the edge of the side walls. In order to allow it to fit inside the Mitre for a straight cut, I first removed the areas that where extruding out with a Tamiya saw I have. I then made use of the Mitre and my Excel Razor saw to get a straight cut where the gable fascia meets up with the Pre Cast concrete wall. A little cleanup work with the file was needed to be carried out once the removal of the existing gables was completed.


As mentioned from my previous blog I removed the top narrow panel of the front and back walls of the kit. I was not able to remove the top section by use of the Mitre, but cut out via the free hand method with the use of the Excel razor saw. This area will be later on replaced with a 1.5 mm x 1.5 mm strip of styrene.


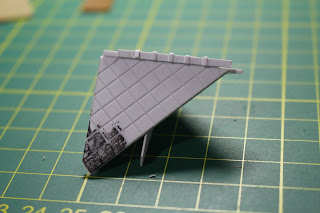
Test build of the roof
I did cut out the area that was needed for the roof from the Squares Styrene sheeting (the outcome to be shown a little later in this post).
At this point I felt that it would be best to do some sort of a test build to ensure that I was heading the correct direction with the roof section. I used offcuts from the Square Styrene sheeting and a couple of gables that I manufactured from styrene. The other purpose of the test build was to practice applying MEK. MEK is a liquid adhesive that reacts with the styrene for a short time and welds the bits of styrene together.
Being new to MEK, I did find it difficult at first to get two bits of styrene to stick together. I ended up giving up on using MEK for a short time. But after a bit of coaching from other members of the model rail club that I am part of, I was able to learn the correct technique on applying the MEK to the styrene.
The two main advantages of using MEK (when used correctly) that it provides a strong bond between the pieces of styrene and it usually sets 15 seconds after the application of it.

As you may have noticed with the test build of the roof, there is a bit of black paint on it. On my work bench, there is a Ryobi emblem on it. When using MEK during the build of this roof, I had it resting on to of the Ryobi emblem where it somehow reacted. It was fortunate for me that it happened on the test build model. Certainly a definite learning experience for me.

I will cover the roof capping and the Finnel portion in a future blog as it will fall into a category of a more modern form of modelling.
Looking forward Peter, to seeing your method of construction of this station building. My model of Tumbarumba started with the Pc3 kit, but I scratch built new front and back walls from styrene. I didn't pick up the roof pitch issue, but the Pc3 kits roof, suitably shortened worked for me. (details on my buildingwagga blog)
ReplyDeleteHi Rob,
DeleteI recently saw your models of Ladysmith and Tumbarumba on display at the Wagga Wagga Exhibition and they all looked great to me. Also been reading your blogs that you that have been posting. Looking forward to your upcoming post. I do like where you are heading with your layout.