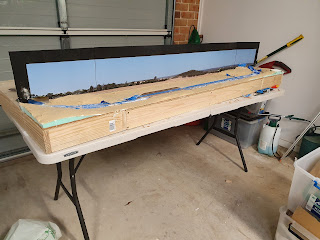
For a while now I wanted to do a N Scale Layout Project. When I started to get serious in the Hobby of Railway Modelling back in 2007, there was very limited ready to run in regards to Australian N Scale, I originally started collecting some American N Scale then later on I started a small collection of British N Scale and over the last few years collected some NSWGR N Scale locomotives and rolling stock.
My interest originally in N Scale came about to the fact when I got Married back in 2007, my wife and I resided in a home that had small rooms that were not big enough (in my view at the time) for a HO scale layout. Furthermore, back then the American N Scale was cheaper to purchase and offered some well detailed ready to run models.
Recently, Auscission Models have been strongly hinting that they have some N Scale Projects for both locomotives and rolling stock in the pipeline such as a the NR Class with the option for a factory fitted DCC Sound decoder. In fact, a preproduction working sample are currently on show within their Shop. I know these models may not be a sell out in their early days of release, but I foresee that there will be a eventual rapid growth with N Scale as there are many in the younger generation who may not have the realestate for large scale layout and the older generation are down sizing to live in a smaller home that may not be able to facilitate a HO or Larger scale layouts. I know some of my readers here will joke about not able to see N Scale as there eyesight is not that good enough to see the model, but working on N Scale exhibition Layouts in the past, we do get a lot of inquiries from the older generation with the desire to downgrade from HO to N Scale. As well as younger folk enquiring on how they can get a start into Australian N Scale.
Now for this Quick, Simple N Scale layout that I have just constructed.
The N Scale Layout Idea
It started with a conversation with Robert P (N Scale Railway Modeller), who said that I could construct a quick and simple N Scale Layout within a few weeks. With some leftover material from my HO Scale Muttama Project and some from Narellan, I felt it may be good to go ahead and do this N Scale layout Project as it will not become a big cost for me in doing so. All that I really needed to purchase was a back scene, some point motors, DC Controllers and some timber for the Framework of the layout. I already had plenty of N Scale track and points that was needed for this project.
Further to this I have done a few NSWGR Lineside structures 3D Printouts in N Scale a few years back that have been waiting to be painted and plonked onto a layout.
Construction of This N Scale Layout
I wanted a simple track plan and simple but effective scenery as this is more of a layout for the enjoyment to run trains.
I wanted to make the layout in a modular setup that it can be easily stored in a cupboard when it is not in use and be able to sit on top of a fold out table.
Landscaping
The Landscaping of this layout is simple. I took the Less is More approach, only adding in the Bridge the Platforms of the station and some hills. I will again take advantage of the Haskell Back Scene (Themed; Dry Country) to do the most of the scenic effect. The Bridge and the Platforms will be scratched built and the Hills will be carved out from insulation foam that I purchased from Bunnings Warehouse.
Landscaping on the other end of the layout.
Jindalee
I have named this Layout Jindalee as it is model on a location similar to Jindalee, which originally had two small platforms with waiting sheds and a road bridge. However, I was not aiming to make it a scale model of Jindalee but more of a representation of it. The main reason for this is that I had most items in my procession to complete this layout without needing to spend months of modelling and it meets the objective of providing enjoyment of just running trains. This layout is now at operational completeness, However, still some other items and enhancements on the way to completed this layout. But for now, I can enjoy running trains on it.
Jindalee layout Dimensions when all modules are joined is 190 cm x 80 cm.
I will do a separate blog on the Bridge, as the bridge build was a bit more involved and the most time consuming part of this project.
Now for the twist in this build that made me complete this layout to the point that it can be exhibited.
An Invite To Have Jindalee Exhibited for The Diamond Creek Easter Train Expo
With only a week before the Diamond Creek Easter Train Expo at Diamond Creek, I was asked to bring down Jindalee. This meant I had to complete Jindalee to be at Exhibition Standard, basically meaning it needed to be in a completed state. It needed facias cut to fit that edging of the layout to not only give the layout a neat finish but also to protect the landscaping on the edge of the scenic sections of the layout. Station Buildings needed to fully constructed and painted, Station Signs to be constructed and painted and more trees needed to be put in place. Also a lighting solution needed to be installed.
I did not take too many pictures as I needed to focus on getting this layout finished.


