To summarise Septembers efforts, work was mainly focused on applying the final solution on the road and Level crossing areas on the Layout. I was hoping to have got more items completed, but other work and life priorities again got in the way. However, I managed to get decent amount done in the few nights that I had at my disposal.
Roads and Level Crossing for Muttama
The road that crosses over the rail line through Muttama will be a dirt road.
I had a couple of choices for the Rail Crossing which was to use Gates which the Gatekeeper would have closed off to road traffic when the Rail Traffic was passing though (hence the existence of the Gatekeepers Cottage), or the Rail Crossing Signs.
After a lot of thinking into the 2 options, I decided to go for the Rail Crossing signs. The reason for this is that I just did not have a lot of information on what type of crossing gates were used at Muttama and that the photos that I do have of Muttama clearly show the Level Crossing signs. However, it is not to say that I may in the future replace the Level Crossing Signs with Gates if I can obtain more information as to what gates were used.
Level Crossing
I decided for the wooden flange ways for the Level Crossing to use styrene. Before super gluing the wooden flange ways so they can be coloured up later on. It is worth pointing out that I tested some locomotives (Steam and Diesel) and other various rolling stock over the Level Crossing to ensure no derailments occur.
I taped up the wooden flanges to allow for the Selleys Spakfilla was applied as shown in the above pictures. Once the Sapkfilla was applied and set, I sanded the Spakfilla to the form that I was looking for. I then coloured up the wood flange ways using the Tamiya Weathering Masters colours.
Woodlands Scenics Gravel Road applied. I applied pva glue down and got the following effect (which was by pure incident), that somehow created to dirt road wash away effect. However, I decided to smooth it when reapplying the Gravel for the second time round.
For the Road I used Woodlands Scenics Bluff fine Gravel. I was hoping that the bluff colour would provide me close to the dirt road colour and texture that I was looking for. The Woodlands Scenic Gravel comes with 2 x packs which one pack contained the gravel and the other contained the colouring pigment that you apply onto the gravel to get the bluff colour. However, the supplied pigment did not stick and gave up on it in the end. However, the gravel was great and I highly recommended as a road base, but I found the next method delivered the results better than I was originally hoping for.
Roadway gravel up and toned up with soft artist pastels of various colours
I ended up making a trip to a local art supply shop where I purchased a few soft artist pastels. I was able to find a good photo of the dirt road nearby where Muttama railway station is and selected a few colours matching to the various tones that are seen on a dirt road. At first, I used pigments that I shaved off the pastels and powdered them on using a soft bristle paint brush. I later found that scribbling the pastel on the roadway and smudging it with a paint brush was more of an effective method which delivered the end result that I was looking for.
Cattle Stops
Level Crossings mainly in rural NSW locations had Cattle stops at each side of the Level Crossing to prevent Cattle and other live stock making their way into the rail corridor. The HO Scale Cattle Grid by Uneek Models are close to the ones that were used at Muttama.
Cattle Stops painted and put in place onto the layout
Level Crossings Signs
There are a few options for Level Crossings signs on the market which are all very suitable choices. With the limited photographic evidence that I have available, Muttama had the typical Level Crossing signs but with a Stop sign attached which I believe would have been a later addition.
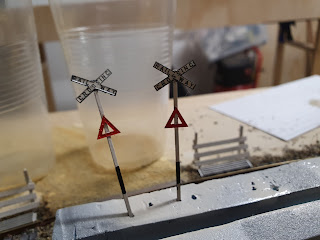
For Level Crossing signs I opted for the Stephen Johnson Models Level Crossing Cast Iron Signs which provides a pair of etched nickel silver signs. The Kit came with a template with measurements where Rail crossing sign and the Triangle needs to be placed. The sign and triangle was soldered onto the supplied rail. I have to say I would recommend this kit for any one who wants to get into soldering etched kits together. For me, this was an easy and quick kit to complete.
I primed the Level Crossing Signs and painted in a Gloss White Paint (as you will need a gloss surface as the decals will adhere better) and applied the other respective colours.
The decals also needed to be cut to size to fit within the area of the level Crossing Sign.
Once the decals were applied, I applied Micro Sol to set the decals in place and then apply Dull Coat (I used the tester Dull Coat) to remove the gloss look and to seal in the decals.
Level Crossing signs assembled
Level Crossing Signs painted and Decals cut to size ready to be applied
Level Crossing Signs complete ready to be installed on the Layout
Level Crossing Signs now installed on the layout.
More updates to come in my upcoming October Post.


